Thursday, October 23, 2008

The Administration Building Final Phase


Well, i am quite happy with what i came up with, the design for some may say it's a bit 'simple' or not so interesting. But if u take a closer look at the design, it is quite resolve in a sense that it is buildable. Envelope on sustainability are very simple but passively design to work for the building...

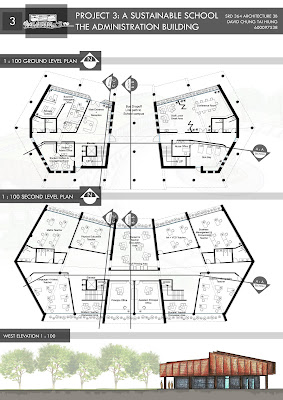
My objective on this project was to design something that is practical and buildable which is what i think everyone should be doing. It is a very realistic project, which we meet clients and utilizing real site and build a school. A very challenging project but in the end i think i get to learn a lot out of it. Not only just for my own design but as a whole group, sharing interests and ideas with each other which helped me learn a lot.

The Administration Building Phase 7


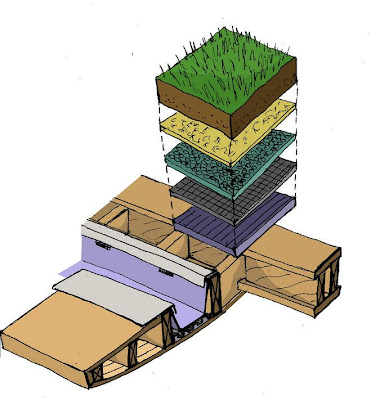
Detail drawings are crucial on my sustainable envelope system...
I've chosen to do a green roof detail and gabion wall detail...The gabion wall act as a crucial part to cool down the building in summer and passively heat the building in early spring or end of autumn. In a hot summer day, the thermal mass of the gabion wall get heated up by the sun or temperature, therefore having a spray water system to spray onto the gabion wall to cool down the gabion wall in order to allow hot air gets transfer thru the cool stones and cool down by the water to allow mild air to cross ventilate the building...
In a winter day, the sun will heat up the wall and when the air breeze thru the heated gabion wall, it will be heat up slightly and provide a hotter air into the building for heating.
THe greenroof, as mention before very good insulation for heating and cooling and sound....which is done in a practical manner which seems to be buildable from that detail...

The Administration Building Phase 6


Section is all up and running now, these section show how the building will cross ventilate passively, allow solar gain in a controlled manner. Light exposure on the right orientation is very crucial... Gabion wall was designed to provide a better thermal mass property.
The load bearing columns will be the reused columns whereas the gabion wall only act as a skin to the building. I know that gabion are not weather tight...therefore i'll do a detail on how to weather prove the building envelope later on...
All in all, im trying to achieve building that contribute to sustainability in a passive manner rather than manually. So i am more focus on lightgain and heating and cross ventilating the building...

Greenroof Research


I was so impressed by the way people design green roof, it has a lot of benefits behind this feature. I'ved done some research on it's construction detail of a typical green roof....soil medium is inbetween 7-22mm, then with all that envelope shown above...

Green roof provide a better insulation blanket to the roof top as well as reducing cooling and heating cost during summer and winter.... Green roof also provide a very good sound insulation which allow people in the work space to work more efficient without interupted by external noise.
Well thru all these research, i was able to construct my roof top design with my own envelope system that refer back to some part of these knowledge of research....

The information of greenroof i got was based on a couple of website but the best i've seen is this one here:

The Administration Building Stage 5


So... perspective are all up and running! Ready to do some sections and detail! haha, these perspective will be retouch on photoshop later one when laying out the final poster...

Some shots shows the entry of the reception and the building....the pathway connecting the school and the bus drop off zone...and also some glimpse on the open space area with grass pavement for students to hang out and seat on during late spring and summer...
The roundabout in the middle will propose some form of aboriginal sculpture in order to commemorate the indigenous origin to the land.
The roof of my building is constructed by green roof.... and i've done a bit of research on green roof, which i will post up later on...

The Administration Building Phase 4


This is the conceptual diagram that i've been refering while doing my elevations and 3D perspective. The design may look a bit layed back, but its buildable, and i am more into a practical side of designing a building rather than being futuristic and design something thats not buildable at all....

Thru refering to the concept diagram and resolved plans, i came up with a 3D basic form of the building, which i will then work on further with hand drawn over it.... I am quite amaze that the shape of the building actually looked quite elegent and simple, which is what my usual preference style of designing....

So the elevations are up finally... Perspective view will be up next week then i'll have to start working on the sections as well....more to come....

The Administration Building Phase 3

On this week, i pretty much focus my design on the building's planning. This plan was fully resolved although the layout are a bit typical, but it is quite practical in a sense of how it works. I am quite happy that the fact that the building's columns are being reused.....and the left over materials were being used on another building, which is the library...

The plan is divided into 2 floors, top and bottom, with staff rooms on top, conselling , sick bay and business managers office on the bottom floor. I will start sketching my elevation on next week....

Administration Building Phase 2


On this week, i've sort of nailed in the materiality of the building, the skin of the building is pretty much cladded with recycled timber, ground floor will be strongly anchored to the ground with heavy mass rammed earth. Then a light timber structure will cover up the top. The reason behind this is obvious, timber low thermal property but highly insulated if well constructed...
Therefore very important to cover the mass of rammed earth during summer.


This plan is my final concept, and all my drawings are drawn relating to this concept diagram.
The round about provide a very good traffic flow for the school since its only for visitor and bus drop off include principle carpark. On the up coming week will be trying to resolve the interior of the plan.....

Administration Building Phase 1


Sketches for different ideas and concept were made in the beginining of my design phase..
I was making decision on whether to make curve roof to provide a better aesthetic, or go with a normal square rectangular decent building look...


Playing around with different ideas on the plan. Curving to plan to try break away from the originality of the building....

The initial thoughts was to hav the building split up into 2 part to create a pathway in the middle for a bus drop off point...

Monday, September 8, 2008

Project 2: Masterplan (Phase 1)

Well, the first thing that we came to resolve was the traffic problem on Grossmans Road, we decided to knock half of the existing council building off and use it as an administration building. The other half was to create a bus only drop-off zone, then open a new access at the private land area for staff and student parking.

After that we began to place our building into the site...library we tend to have it centralized with more open area surrounding it as an outdoor learning space.

Gym was placed on the south-west in order to link up with existing oval and basketball court.

Design Technology class room located near carpark area for easy unload material.

Performing art theatre located near car park for easy access during after hours performing events.


After the review, we are told to touch up the masterplan, redefine a better solution for wind problem, reconsider gym as a public space and place near the carpark, and provide a more centralized open space rather than having building scatter all around the site...

Project 2: Site Analysis

A lot of problems and issues had been discussed and examined.


The major problem for the site is WIND, the building that we planned to locate on the site are to try and minimize the wind problems gonna occur...


Firstly we looked at the site in a from a larger scale point of view...


Drawings below shows where the location of the site is,


The traffic flow on a further scale rather than just the site within...


And also touched slightly on how urban growth development may affect on the future school...


Then we moved on to Torquay's history, and did a research time line on the site's history..


After doing all the background research, we moved closer to our site and did a closer analysis..


The wind flow diagram shown below was based on our on-site experience, we found out that high wind area tends to be on very flat site, wind barriers are unable to overcome high wind areas shown below...


Then we did an analysis on site access, sun path and also the minor slope where the water tends to run off..In this analysis, especially on the site access, we decided not to interupt with the current access flow, and tends to utilize the flow path into our masterplan.


When all analysis were done, we began to set out a design brief base on the analysis and research that we did, and narrow down our design within these sets of criteria...

Projects 2 + 3: A Sustainable School


Project Brief:
This sustainable school is broken into 2 parts:
Project 2: Develope Masterplan for the school
Project 3: Design a sustainable school building chosen from the designed Masterplan
So, during these 2 week process, group 20 + 25 went for a site visit twice. The first visit was an introduction regarding to the brief, and a quick glimpse on Torquay's background....

Then we went to the actual site to do some site analysis the week after the first trip...
Just a photo of our group members (Group 20+25)...
From left to right:
Ping, Michael, Andrew, Dangdang, David Chung


Site photos are taken in order to understant a bit more of its topography such as water runoff, surrounding neighbours, link to site, wind issue and so on...


Panorama 1

This shot shows how the existing site is linking with its neighbouring boundary. The basketball court and oval may be a good way to link the school together by putting a gym near it.


Panorama 2


Panorama 3


This shot shows a slight water runoff direction, and a minor slope that is hard to notice. However in general it is still a pretty flat site to work on.


Saturday, August 30, 2008

Final Product (The Youtube Video)

The Weblink to our youtube video is:
http://www.youtube.com/watch?v=7O61Z4rO-ec

Hope you guys will enjoy it...haha!

MOD 5 Design Development (Phase 2 to Final)

In phase 2 of our design:
Aim was to fit the unit up in a truck, therefore the dimension of our unit is basically base on a truck size dimension, pretty restricted but we were able to get out with a good solution.

The truck is able to catter up to 8 units, a typical classroom takes up to about 7 units..
therefore about 2-3 trucks is require to transport our proposed scheme classroom shown below.


Once everything was finallize, we built a site model reflecting on how the classroom are meant to orientate on the sight. We decided all glazings should be shaded by timber battens louvers. The scheme consist of an internal courtyard for children to play and social with each other during break time. It is also a good outdoor learning place for the teacher to utilize.

Diagram of winter and summer sun is shown on the system we design... More other systems were introduced such as hydraulic floor heating, solar power, rainwater catchment and etc. . All these systems are available on the following weblink: http://www.youtube.com/watch?v=7O61Z4rO-ec. It is our final product compiled into a video.


More photos of Structural components for the model and the finnish product of 1:20 classroom model.
Prefabricated Units:


and finally....the assembled classrooms....